Hay..
What's Up..?
To day I Speak a new topic How to Add Namecheap's Domain Added to blogspot blog.
I got another new topic. But today's post is specially for beginners. That is, this post is for you who are new to Google Blogger. So, those who are well-versed in the subject, please, if you can learn something new from this post, apologize. However, those who are new to the blog must read this post and learn a lot after reading.
Today you will be shown how to blog on the blogger blogspot site.
I will show you the domain name of the global Domain-Hosting Site NameCheap as an example, let's you.
I'll say something before starting the post:
This domain add-on system is only applicable to paid domains but you can also try this system in the domain of FreeNom.
First you have to go from the Nemchip site
The domain that you bought
Log in to the control panel.
For this reason Go to this link ✓
The screenshot below
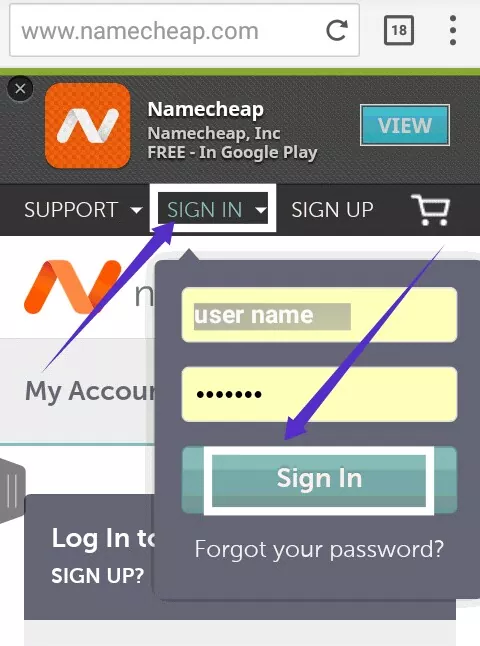
Like sign in from the top bar. Now see the right side of your screen
A login form has arrived. Here you can buy your domain, email or username for any one day and password in the box below. Sign up now by clicking Sign in.
Now see Control your domain
Panel opened Now you
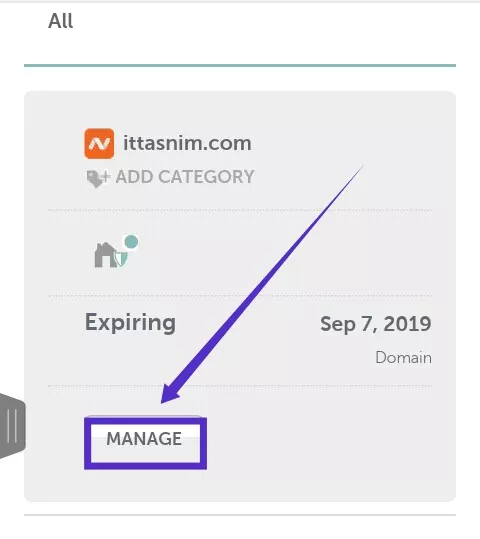
The domain that you add to the blogger below is manage. Click there.✓
 It is best to do this in the DomainAyad mode, if your browser is in desktop mode
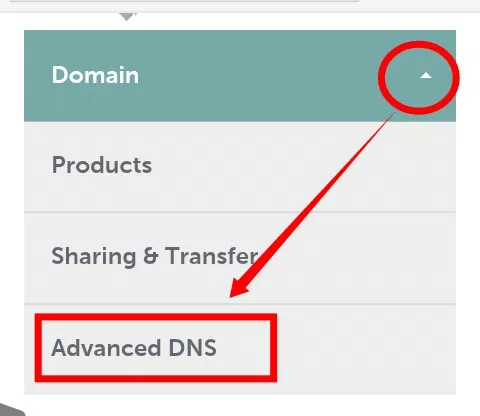
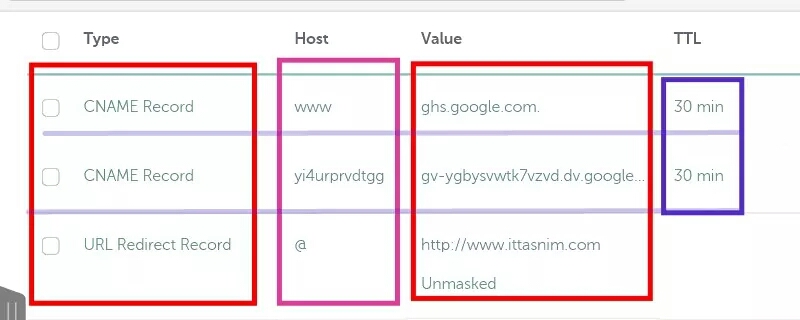
There will be an option called Advance DNS. Click there. Not understand
Follow screenshots.
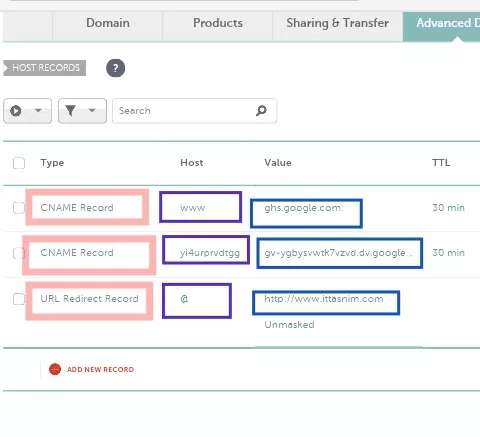
Now, like the following, two cname recored and 1 url redirect record will be added.
 Now go to your blog site settings like the screenshot below.
 Now click on the ad domain and enter it. Now you can see the data in the two screens of the cname like the mark in the screenshot below. Two records will be added to our domain panel. The two cname records I said were the data of that cname record.
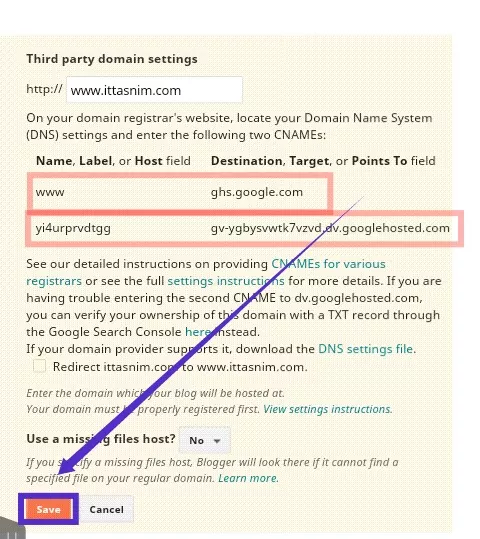 But do not click on add now. Please take a little bit. You know, as a result of greed. Now place the first cname data of your blog in the first cname record room of the domain forward dns first. Similarly, copying the second cname data in the second cell is exactly like the following. Enter your Domai name as follows
 Now go to your blog's settings> Add domain and click on Add your domain.
If you are in your domain panel
If you can add records like I do, then your domain will be advertised on the blog then follow this rule.
Thank You.
What's Up..?
To day I Speak a new topic How to Add Namecheap's Domain Added to blogspot blog.
I got another new topic. But today's post is specially for beginners. That is, this post is for you who are new to Google Blogger. So, those who are well-versed in the subject, please, if you can learn something new from this post, apologize. However, those who are new to the blog must read this post and learn a lot after reading.
Today you will be shown how to blog on the blogger blogspot site.
I will show you the domain name of the global Domain-Hosting Site NameCheap as an example, let's you.
I'll say something before starting the post:
This domain add-on system is only applicable to paid domains but you can also try this system in the domain of FreeNom.
First you have to go from the Nemchip site
The domain that you bought
Log in to the control panel.
For this reason Go to this link ✓
The screenshot below
Like sign in from the top bar. Now see the right side of your screen
A login form has arrived. Here you can buy your domain, email or username for any one day and password in the box below. Sign up now by clicking Sign in.
Panel opened Now you
The domain that you add to the blogger below is manage. Click there.✓
There will be an option called Advance DNS. Click there. Not understand
Follow screenshots.
If you are in your domain panel
If you can add records like I do, then your domain will be advertised on the blog then follow this rule.
Thank You.

No comments